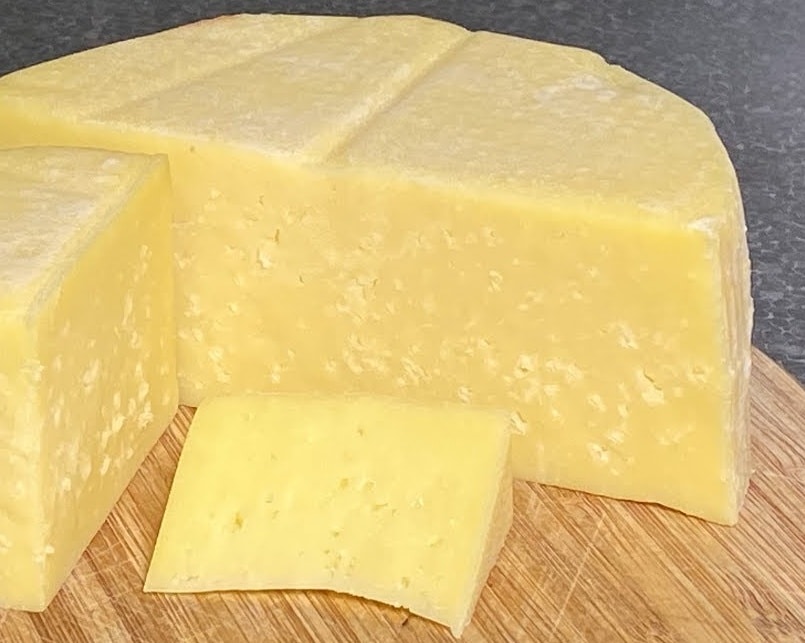
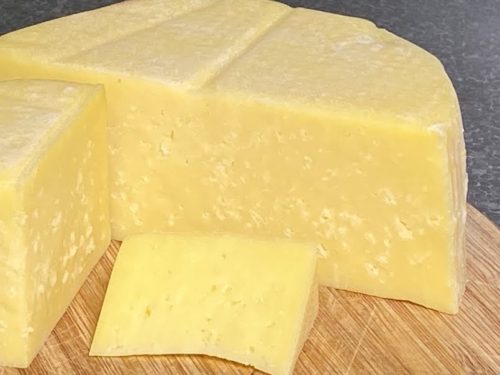
How to Make Cheddar

Without a doubt, Cheddar is the world’s most popular cheese. But, have you ever wanted to make your own cheese at home? Read on to learn how to make Cheddar using this recipe by Gavin Webber.

Prefer to watch a video? Scroll to the bottom for the step-by-step recipe.

[Disclaimer: This post may contain affiliate links. If you use these links to make a purchase, we may earn a commission at no cost to you.]

YIELD

1 kg

AGING

3 mths

SKILL

Medium

AUTHOR

Gavin Webber

YIELD

1 kg

AGING

3 mths

SKILL

Medium

Homemade Cheddar cut in half on wooden board
Homemade Cheddar - Gavin Webber

About the cheese

Cheddar is an iconic British hard cheese that finds its roots in Somerset, England. Actually, the earliest mentions of this cheese can be traced back to picturesque Cheddar Gorge and the tiny village of Cheddar.

This recipe for Cheddar was created by home cheesemaking legend, Gavin Webber, and is rated at an medium level of difficulty. Keep reading after the break to find out what ingredients and equipment you will need.

Ingredients

10 L (10 qt) Full Cream Milk, preferably pasteurised/unhomogenised

⅛ Teaspoon (Dash) Mesophilic Culture MO30

2.5 ml (½ tsp) Calcium Chloride in ¼ cup water

2.5 ml (½ tsp) Liquid Rennet in ¼ cup water

12 drops of Annatto in ¼ cup water

1½ tbsp Cheese Salt

Butter, Lard or Coconut oil for banding

Equipment

Cheese Press

165 mm Cheese basket with follower

Cheese drying mat or Bamboo mat

Dairy Thermometer

Stainless Steel Stirring Spoon

Mini measuring spoons (for cultures)

Loose weave Cheese Cloth

Method

Adding ingredients

1

Sanitise all equipment.

2

Warm your milk to 31°C (88°F), stirring gently whilst bringing up to temperature. Turn off the heat.

3

Sprinkle culture over the surface of the milk and allow to rehydrate for 5 minutes. Stir thoroughly in an up and down motion without breaking the surface of the milk. Cover and allow to rest for 40 minutes at the target temperature.

4

Add the Annatto solution and mix well.

5

Add the Calcium Chloride solution and mix well.

6

Add the rennet solution to the milk and mix thoroughly using the same up and down motion for no more than 2 minutes. Cover and allow to set for 40 minutes.

7

Check for a clean break. If necessary, leave for another 10 minutes then check again.

Cutting the curd

1

Check for a clean break and cut the curds into 1.25 cm (½ inch) cubes.

2

Rest for 5 minutes to allow curds to heal.

3

Return to a low heat and gradually raise the temp to 39°C (102°F), stirring gently and continuously, during the period of 45 minutes. Don’t heat too fast. This slow process allows more whey to be expelled and avoids bitterness in the fully aged cheese.

4

Once the target temperature is reached, turn off the heat. Let the curds rest for 40 minutes maintaining the temperature at 39°C (102°F) .

Cheddaring, milling and pressing

1

Drain curds and whey through cheesecloth lined colander. Return the curd slab back to the pot for cheddaring, place pot back into the double boiler to keep the curd slab at 39°C (102°F).

2

Cut the slab in half and cover pot and allow curds to stand for 10 minutes.

3

After 10 minutes, turn each slab over. Let stand for another 10 minutes.

4

After 10 minutes, turn each slab over. Let stand for another 10 minutes.

5

After 10 minutes, turn each slab over. Let stand for another 15 minutes. That’s 45 minutes cheddaring time in total.

6

Drain the two slabs through cheesecloth lined colander, then place the slabs onto a chopping board.

7

Cut the curd into 5 by 1.25 cm (2 by ½ inch) fingers.

8

Using your pot as a container, break each finger in half and then toss the salt through the curds. This is called milling.

9

Line a 165 mm cheese mould with cheesecloth and fill with the curds. Cover the curds with the corner of the cheese cloth, top with a follower, and press at 11 kg (24 lbs) for 1 hour.

10

Remove the cheese from the press, and slowly and carefully unwrap it. Turn the cheese over, rewrap it in the cloth and press at 22 kg (50 lb) for 12 hours.

Air drying and waxing

1

Then place on a cheese mat and board and let air dry at room temperature until it is dry to touch (usually 2-5 days). Turn twice daily to allow for even drying.

2

Cloth band or wax the cheese and allow it to age for 3 months for mild, 6 months for medium, 12+ months for Vintage Cheddar. Ripen in a humid cheese fridge at 10-12ºC (50-54ºF) at 80-85% humidity. Don’t forget to turn weekly, to allow for even distribution of the fats and flavour.

Watch the entire recipe on video

Recipe card

Homemade Cheddar cut in half on wooden board

How to Make Cheddar

Make the world's most popular cheese in your own home
Aging 90 days
Total Time 90 days
Course Cheese
Cuisine English
Servings 20 serves
Calories 200 kcal

Equipment

  • Cheese press
  • 165 mm cheese basket with follower
  • Cheese drying mat
  • Dairy thermometer
  • Stainless steel stirring spoon
  • Mini measuring spoons
  • Loose weave cheese cloth

Ingredients
  

  • 10 L full cream milk pasteurised/unhomogenised
  • 1/8 tsp mesophilic culture MO30
  • 2.5 ml liquid rennet mixed in ¼ cup of water
  • 12 drops annatto mixed in ¼ cup of water
  • tbsp cheese salt
  • butter, lard or coconut oil for banding

Instructions
 

Adding ingredients

  • Sanitise all equipment.
  • Warm your milk to 31°C (88°F), stirring gently whilst bringing up to temperature. Turn off the heat.
  • Sprinkle culture over the surface of the milk and allow to rehydrate for 5 minutes. Stir thoroughly in an up and down motion without breaking the surface of the milk. Cover and allow to rest for 40 minutes at the target temperature.
  • Add the Annatto solution and mix well.
  • Add the Calcium Chloride solution and mix well.
  • Add the rennet solution to the milk and mix thoroughly using the same up and down motion for no more than 2 minutes. Cover and allow to set for 40 minutes.
  • Check for a clean break. If necessary, leave for another 10 minutes then check again.

Cutting the curd

  • Check for a clean break and cut the curds into 1.25 cm (½ inch) cubes.
  • Rest for 5 minutes to allow curds to heal.
  • Return to a low heat and gradually raise the temp to 39°C (102°F), stirring gently and continuously, during the period of 45 minutes. Don’t heat too fast. This slow process allows more whey to be expelled and avoids bitterness in the fully aged cheese.
  • Once the target temperature is reached, turn off the heat. Let the curds rest for 40 minutes maintaining the temperature at 39°C (102°F) .

Cheddaring, milling and pressing

  • Drain curds and whey through cheesecloth lined colander. Return the curd slab back to the pot for cheddaring, place pot back into the double boiler to keep the curd slab at 39°C (102°F).
  • Cut the slab in half and cover pot and allow curds to stand for 10 minutes.
  • After 10 minutes, turn each slab over. Let stand for another 10 minutes.
  • After 10 minutes, turn each slab over. Let stand for another 10 minutes.
  • After 10 minutes, turn each slab over. Let stand for another 15 minutes. That’s 45 minutes cheddaring time in total.
  • Drain the two slabs through cheesecloth lined colander, then place the slabs onto a chopping board.
  • Cut the curd into 5 by 1.25 cm (2 by ½ inch) fingers.
  • Using your pot as a container, break each finger in half and then toss the salt through the curds. This is called milling.
  • Line a 165 mm cheese mould with cheesecloth and fill with the curds. Cover the curds with the corner of the cheese cloth, top with a follower, and press at 11 kg (24 lbs) for 1 hour.
  • Remove the cheese from the press, and slowly and carefully unwrap it. Turn the cheese over, rewrap it in the cloth and press at 22 kg (50 lb) for 12 hours.

Air drying and waxing

  • Then place on a cheese mat and board and let air dry at room temperature until it is dry to touch (usually 2-5 days). Turn twice daily to allow for even drying.
  • Cloth band or wax the cheese and allow it to age for 3 months for mild, 6 months for medium, 12+ months for Vintage Cheddar. Ripen in a humid cheese fridge at 10-12ºC (50-54ºF) at 80-85% humidity. Don’t forget to turn weekly, to allow for even distribution of the fats and flavour.
Keyword Cheesemaking

Leave a Comment

Your email address will not be published. Required fields are marked *

Recipe Rating


Scroll to Top